|
VISION Documentation |
|
Last update: 05/05/00 |
|
5. BLOCK MANAGEMENT |
A block is a part, be it rectangular or not, of the image. It is also called the current selection. The selection commands of the Edit menu work on the content of the current selection. The selection is visible on the screen thanks to its outline, drawn with dotted lines upon the image. Select a part of the image, using the block selection tool in the Tools2 menu or in the tools window. Press the left mouse button until the desired area is selected for a rectangular selection, otherwise the lasso has to be used: keeping the mouse button pressed draws the shape on the screen, releasing the mouse button allows to draw broken lines (a point for each mouse click). To stop the drawing, click on the right mouse button. The shape is then closed between the first point inserted and the last. Moving the displayed area of the image inside the window allows to select areas larger than the display. To cancel a selection, click on the Block tool without keeping the mouse button pressed. The chosen selection stays active in the image, even when other tools are used. Only cancelling the selection or creating a new one will delete the preceding selection.
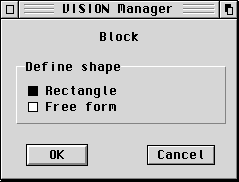
Configuring the selection type
The clipboard is a buffer area, in memory and/or on disk, which keeps the last cut or copied selection. If the "Use GEM clipboard" option is selected, the buffer will be written on disk in the "CLIPBRD" system directory. It can then be used in other programs, even after VISION has been quitted. The buffer image is named SCRAP.IMG or SCRAP.TIF, the TIFF format being used only for True-Colour images.
Copies the current selection in the clipboard, and deletes this selection in the image.
Copies the current selection in the clipboard without deleting it from the image.
Pastes the content of the clipboard on the current image. Put the selection to the desired area with a click. To cancel the operation, click with the right mouse button.
| Depends on | The drawing mode |
| Note | The display area moves automatically on the image when the selection comes near the window border. It is thus possible to put the selection on an area which was not visible when it was created. If the information bar is displayed on the window, the x,y position of the bottom left position on the image and the l,h,y size of the selection are displayed |
Creates a new image from the current selection, and displays this new window on the screen. This image has the size and the number of colours of the initial selection.
Deletes the content of the current selection without copying the content in the clipboard.
The complete current image is selected.
Replaces the content of the current selection by its negative (inversion of each pixel bits).
Applies a mirror effect to the selection if there is one, or to the complete image. The image or the selection is replaced by its image in a horizontal or vertical mirror, or through a central symmetry.
 |
This dialog, which can be
reached either with a right click on the block icon in
the toolbar, or with ALT+left click, allows to choose
which type of selection must be used when the block icon
is selected:
|