|
VISION Documentation |
|
Last update: 05/07/98 |
|
3. IMAGE MANAGEMENT |
Allows to create a new image, specifying its characteristics:
The image size in pixel is limited to 32768 x 32768 pixels, but the memory available in the computer sets another limit.
The number of colours depends on the current resolution. An image can only be created with a resolution less than or equal to the current resolution. Thus, an Atari in ST low resolution can only create images in 2, 4 or 16 colours, whereas a Falcon in 256 colours can create images in 2, 4, 16 or 256 colours. However, I would recommend to always work upon an image in a resolution having the same number of colours as the image.
Resolution is used in Desktop Publishing programs to know the size of the image for printing. Thus, it must correspond to the printer characteristics. This information is not useful to work on the screen (which resolution is 72x72 dpi).
The name will be used when saving the image. By default the image is named NEW. The format is TIFF for True Colour and IMG for the other resolutions.
3.2. The different recognised formats
There does not exist a standard format for image files. VISION recognises 8 image formats and thus ensure a large compatibility with images coming from ST, PC and Macintosh software:
| Format | Extension | Note |
| IMG | .IMG | Standard GEM bitmap format, it is the most widely used for large black & white images. IMG handles images from black and white up to 256 colours, with a medium compression. |
| XIMG | .IMG | It is an extension to the IMG format, with a storage of the palette (range of colours chosen for this image). Handles images from black and white up to 256 colours, with a medium compression. |
| Art Director | .ART | Screen format used by some Atari software. Limited to 320x200 images in 16 colours. |
| Degas Elite | .PI1 to PI3 PC1 to PC3 | Format used by the most known Atari ST screen drawing software. Handles 320x200 images in 16 colours, 640x200 in 4 colours and 640x400 in 2 colours. Only non compressed PI? formats are handled for saving. |
| Neochrome | .NEO | Screen format used by some Atari ST software. Limited to 320x200 images in 16 colours. |
| Mac Paint | .MAC | Format for 576x720 monochrome images from the Apple Macintosh drawing software: Mac Paint. This format is only handled for reading. |
| Graphic Interchange Format | .GIF | Widely used format available on numerous servers. Handles images from black and white up to 256 colours with a good compression rate. The interlaced mode is recognised by VISION since version 3.5 |
| Tagged Image File Format | .TIF | This format is the most used in Desktop Publishing and digital pictures. Handles images from black and white up to True Colour, with numerous compression options. |
| Joint Photographic Expert Group | .JPG | Format often used for True Colour images, since it offers a very good variable compression rate. VISION only handles this format through Brainstorm/Atari JPEG driver, meaning it works only on Falcon, and for reading only. |
| Targa | .TGA | Often used for its very simple True Colour mode. |
| Bitmap Windows | .BMP | Equivalent to IMG under Windows. Any resolution and number of colours. Its RLE compression type (not handled) is similar to the IMG one. That is why TIFF or GIF format is always preferred. |
To know the different resolutions recognised by these images, please see the compatibility table of the "Open as" and "Save as" commands.
3.3. Opening an existing image
Loading from disk or a floppy is achieved with the Open or Open as commands in the File menu. Loading a TIFF or GIF image can be long, it can be interrupted by pressing Ctrl C.
When this command is selected, the file selector appears in order to select the desired image. VISION loads it (more or less quickly depending on the format) and displays it in a window. VISION recognises the format based on the extension of the image name. Example: ESSAI.TIF is recognised by VISION as a TIFF image. If the resolution of the image has more colours than what it is possible to display, or if the image is too large for the memory available, VISION will not be able to load the image. However, if the image has more colours than the current resolution, VISION offers to dither the image. This dithering will of course mean a loss of information. If the image is modified and saved, this loss of information will be permanent. That is why, before working upon an image, one should always use a resolution having the same number of colours as the image...
This command is useful when the extension in a file name does not correspond to its image format. In this case, the image format has to be known and indicated to VISION. The file selector allows to select the file, then the selection of its format is done in a list. If the file format does not correspond to the indicated one, VISION will not be able to load the image.
Closing an image can be done with the Close command in the File menu, or by clicking on the close button in the corresponding window. If the image has been modified, VISION will ask whether it should be saved before closing it.
Saves the image contained in the current window under the same name and in the same format than when it was loaded. When an image is created with the New command, it is saved under the chosen name, in VISION's default format. Default format is IMG for images having less than 256 colours, and TIFF for True Colour images.
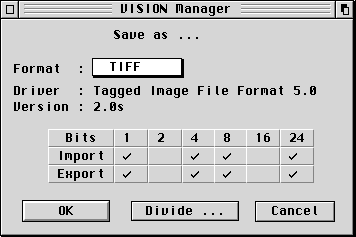 |
Saves the image contained in the
current window, specifying its format then the name under which it
will be saved. When the file selector opens,
VISION displays the extension
corresponding to the selected format. Specifying a format displays
a compatibility table between this format and the different
graphic modes: In the preceding example, the TIFF format recognised by VISION allows to save (export) or to load (import) monochrome, 16 colours, 256 colours or 16.7 million colours images. |
Since version 3.5, VISION allows to divide the image to be saved in sub-images, and thus to split this image into as many files as desired by chosing the "Divide" button:
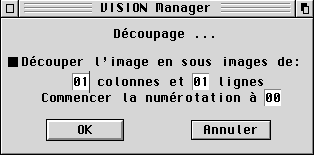 |
You can choose to divide the image to
be saved in n lines and n columns. Each block thus defined will be
saved in a separate file. The name of this file will be the
current name of the image to which a number will be added. This
number will be incremented from the value defined by the number
field. In the end, n*m numbers will be generated. If only one line and one column are specified, a single file will be generated, and there will be no division (this is equivalent to not specify a division). |
Correspondence between number of bits <-> number of colours:
| Bits | 1 | 2 | 4 | 8 | 15 | 16 | 24 | 32 |
| Colours | 2 (Mono) | 4 | 16 | 256 | 32768 | 65536 | 16777216 | 16777216 |
The 32 bits mode keeps 8 bits free, that is why it does not offer more colours than the 24 bits mode. Its advantage over the 24 bits mode is that is is faster (long words are processed, instead of 3 bytes blocks). Furthermore, the 24 bits mode is not handled by VISION (no possibility to test!).
VISION can convert automatically a group of images from one format to another with the "Batch Convert" option, in the "File" menu:
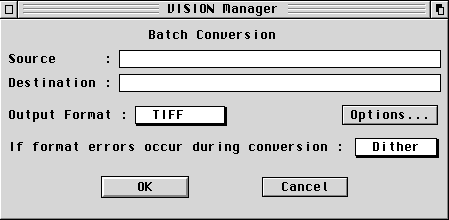 |
You just have to specify the path(s) of the source files by clicking on the "Source" area, optionaly giving a file mask. You then specify the destination folder where the resulting images will be stored. The file name will be kept, only its extension will be replaced to correspond to the new format. If the output format is not compatible with the input format (number of colours not handled) VISION offers to dither the resulting image, or to skip this file. The "Options" button allows to specify options that vary according to the output format. Since version 4.0a, it is possible to delete the source, or to move to another directory. You can also decide to delete files having the same name in case of conflicts during copies.These last option have only an effect if the conversion worked properly. |
The catalogue allows a quick viewing of images as thumbnails, to display a set of images according to criteria (3 criteria in customisable popups and a free comment for each image), and to open an image from its thumbnail in the catalogue. The catalogue is accessed through the "Catalogue" option in the "Edit" menu:
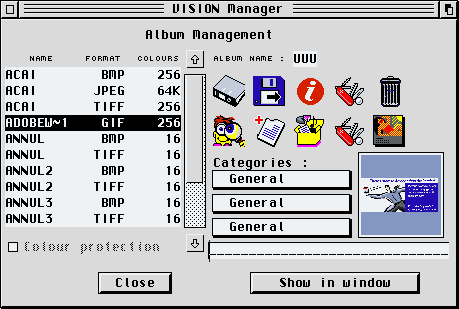 |
Each icon in this panel has a help bubble, which is available by simply letting the mouse cursor more than 0.5 s on the chosen element. The current catalogue list gives the number of image files, their type and number of colours. Clicking on an element of the scrolling list displays the thumbnail (reduced view of the image), its categories, and its associated comment. To insert a category, simply click on the corresponding popup and select the desired category. |
To create a category, simply click on a category popup and choose "New..."
From Top to Bottom and Left to Right, icons allow to access to the following functions:
Catalogue configuration:
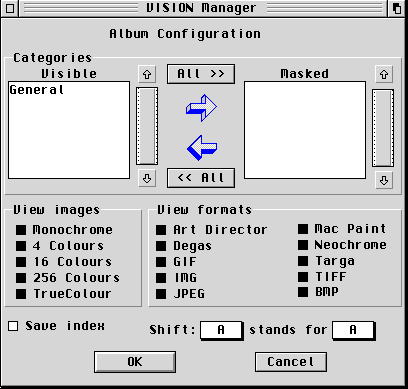 |
This panel allows to select the
categories to be displayed (Visible categories) and those to hide
(Masked categories). The icon arrows allow to change the state of
the selected category on both sides. It is also possible to filter on colours and image formats with the boxes below. The Save index option allows to save a quite important wait time with huge catalogues opened frequently. Shifting letters is useful for removable media (e.g., CD ROM). With this option, a catalogue created on a CD ROM declared as "G:" will be usable, even if the CD ROM is declared as "H:" on another machine. |
The "Show in window option" opens a GEM window in which all the current thumbnails will be displayed. It is possible to browse this window with the vertical slider:
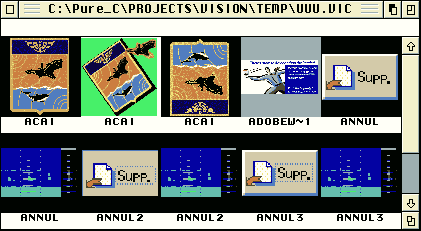
In modes other than True Colour, clicking on a thumbnail sets the corresponding palette. It is also possible to restore the standard palette with the "Tab" key.
A double click on an image name or on the thumbnail loads the original image. You can browse the windowed catalogue with the vertical slider and, since version 3.0c, with the Up and Down cursor keys.
Since version 3.5a, the size of this window can now be changed like any window containing an image.
Dithering TC-->256 colours is now applied since version 3.5a, unless you have forced a dithering to greyscales.
Since version 4.0a, the catalog and its window view are non modal!
Since version 4.0a, a right click on the windowed catalog gives access to HTML export, which can be configured by this dialogue:
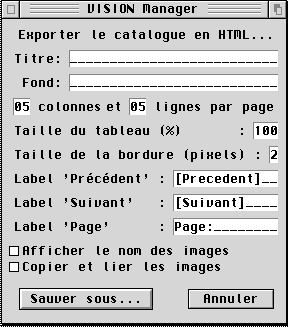 |
Title allowing to give a title to the
generated HTML page. Background opens the file selector to indicate a background image. You can indicate the number of lines and columns on a page using the fields provided for that. If you enter 0, a single HTML page will be generated. You can indicat the percentage of horizontal usage of the table containing the thumbnails of the catalogue. The table border in pixels is specified in the associated edit field. You can specify the text (Label) giving access to next and previous pages You can also change the text (Label) giving access to all generated pages Each image will appear as a thumbnail, you can also display the name of the image under the thumbnail. If you decide to copy and link the images, you will obtain HTML pages pointing directly on a copy of the images. A "mini" folder containing the thumbnail images will be created. If you decide to copy and link the images, a sub-folder "images" will also be created. Enough talk, here is an example! |
The slideshow allows to display on full screen the images previously selected. To create a slideshow, the simpler way is to use a catalogue:
The options for this slideshow may be customised in the Preferences, with the "Slideshow" button: Customising the slideshow
The following keys are available during the slideshow:
| Esc | Stops the slideshow |
| Cursor key -> | Cancels loading of the current image, and goes on to the next. This action is done for each key press, making it possible to advanced quickly through the slideshow. Note however: when loading an image, some parts of the process can be cancelled, but dithering and sizing cannot. The key press is not lost anyway, but the image will not be skipped immediately. |
You can also edit a slideshow file "by hand", since it is actually just an ASCII file. Each line corresponds to a command which can be:
After each command, a space has to be inserted. There is no distinction between lower and upper case. As of version 3.0c, it is also possible to add a comment at the end of a line, using the ';' character.